Auto-text Templates
This screen can be used to create auto-text templates for use with all sources. A template can be a combination of text, keyword tags and functions. When the Auto button is clicked on the main screen an appropriate template can be selected and the various keywords and functions applied to automatically attempt to produce a transcription of the original source document. The Standard Auto-text Templates topic gives further information about templates including those included in Ancestral Sources.
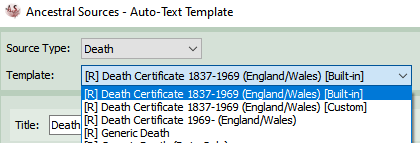
You should select a source type (e.g. Baptism) from the list and then either choose from the list an existing template to edit or create a new template by clicking on the new button. An existing template can be duplicated by selecting a template and clicking on the duplicate button.
You can not edit a built-in template. If you attempt to edit a built-in template, or create a template with the same name as a built-in template, then a duplicate copy will be made and flagged as 'Custom'. Therefore you can have a built-in and custom version of a template with the same name. The words [built-in] or [custom] will be displayed to indicate the difference between them.
Editing a template
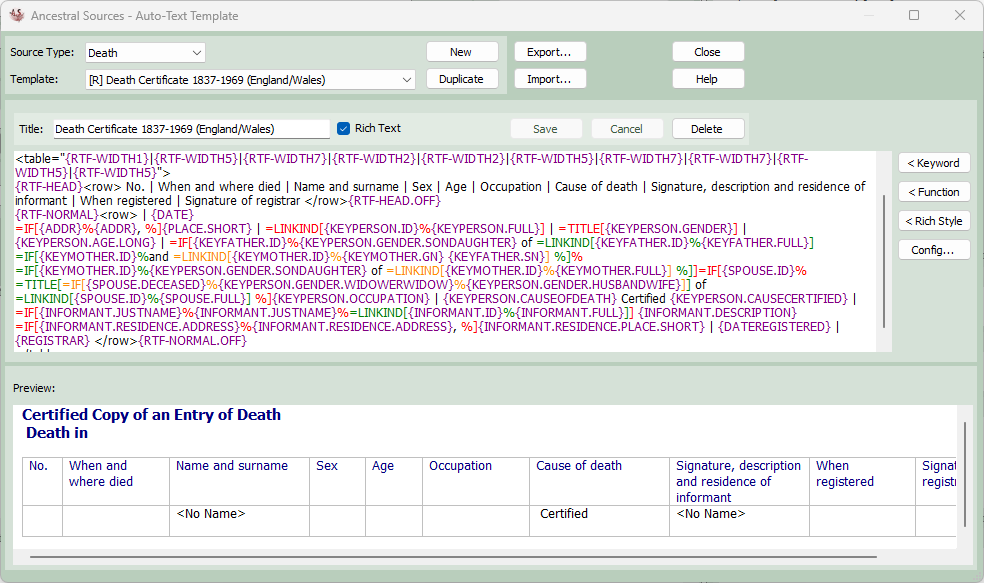
A template needs to be given a title and there is also an option to specify whether a template uses rich text or not. Rich text templates can only be used with family history files created in Family Historian 7 or later. Once the title has been entered then the text of the template can be entered below. Keyword tags and functions can be combined to ensure that the transcription produced is as accurate as possible. A list of keywords and functions can be found on this help page: Template Keywords and Functions. There are also keywords that be used to control the text formatting with rich text templates.
For example, in a baptism transcription it may be common to have an entry which includes text such as:
Alice daughter of John and Anne Smith
To ensure that the correct names and also the word daughter (or son) is appropriately entered the following template could be created:
{KEYPERSON.GN} {KEYPERSON.GENDER.SONDAUGHTER} of {KEYFATHER.GN} and {KEYMOTHER.GN} {KEYFATHER.SN}
i.e. the given name of the baptised individual followed by son/daughter depending on the gender of the individual, then the word 'of' followed by the father's given name, the word 'and' then the given name of the mother followed by the father's surname.
By using the =IF function it is possible to choose to display one of two options depending on whether a particular keyword equates to a value or is blank. The three sections of the IF function are separated by the % character. For example:
{KEYFATHER.GN} =IF[{KEYMOTHER.GN}%and {KEYMOTHER.GN} {KEYFATHER.SN}%{KEYFATHER.SN}]
If the mother's given name is recorded then it would become:
John and Anne Smith
but if the mother isn't recorded then it would become:
John Smith
Functions can also be 'nested', e.g. =IF statements can appear within other =IF statements. This can lead to some very flexible templates being created but they can also become quite complex. There is no practical limit to the depth of this nesting of functions.
If the template being edited is for the same source document type that is being edited on the main screen then a preview of the template being edited is shown at the bottom of the screen.
When a rich text template is being edited there are some characters which have to be 'escaped', otherwise they may replicate some control characters that are used by Family Historian. These characters are: " \ | < > * and ) and will need to be preceded by a backslash.
Colour Coding
In the template editor, by default, Keywords will be shown in purple and Functions in Red. If a function is contained (nested) within another function it will be shown in a different colour again. This helps to distinguish where each function starts and ends as the closing brackets and separators will be shown in matching colours. As functions can often be nested to multiple levels (functions in functions in functions, etc.) there are four colours that are used to distinguish the level of nesting and these are recycled if the nesting goes beyond 4 levels. This functionality and the colours used can be modifed via the Config... button that reveals the following configuration dialog:

Click on a colour to change it. The Reset button will set the colours back to the default installation colours and settings used by Ancestral Sources. If the use function nesting colours is unticked then all functions will use the specified Function Colour (red by default), regardless of whether the function is nested/contained within another function.
For avoidance of doubt, the colours displayed in the template editor will not appear in the template itself. To use colours in the templates you need to use the {RTF-NORMAL}, {RTF-HEAD} or {RTF-TITLE} rich-text keywords (See Template Keywords and Functions).
Importing and Exporting Auto-text Templates
Customised auto-text templates can be exported to an XML format for sharing with other Ancestral Sources users, perhaps via the Family Historian User Group.
To export auto-text templates click on the Export... button. The Export Auto-text Templates dialog will appear.
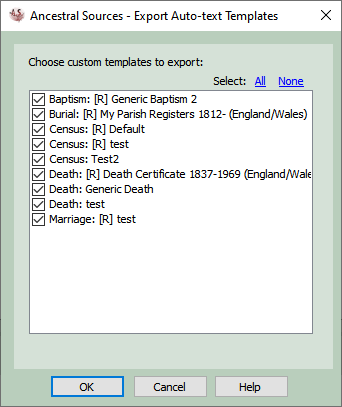
Select the templates you would like to export and then click OK. You will then be asked to select a location to save the exported file.
To import auto-text templates click on the Import... button. You will be asked to select an XML file to import containing custom auto-text templates. The Import Auto-text Templates dialog will appear showing you all the templates contained in the file.
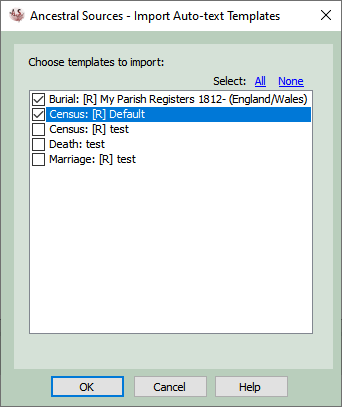
Select the templates you would like to import and then click OK.