Census Source Conversion
Introduction
Users of Ancestral Sources (and its predecessor Gedcom Census) could have potentially created thousands of census sources in the past before Family Historian 7 and Ancestral Sources 7 appeared in 2020. These sources may all have plain text source text and would use generic rather than templated sources. The Census Source Conversion screen can be used to help to convert these census sources to use rich text tables instead and/or to convert generic sources into rich-text.
It is important to note the following:
Assuming you are currently in the census source type 'mode' and use Method 1, you can click the Census Source Convert... item in the Tools menu to open up the Census Source Convert screen.
Getting Started: Select a Source
The panel at the top left of the screen is used to select a census source for conversion. By default the Plain-text source text only box will be ticked, which as the name suggests, will filter the drop-down list of sources to not show sources that use rich-text. You may choose to untick this if you're converting rich-text generic sources into templated sources. There is also a Generic Sources only check-box to filter the list to just show generic sources. If the Source Filter check-box is ticked then the usual rules for filtering will be used, as specified in the Source Identification section of the Options screen. If necessary you can further filter the sources by specifying words that must appear (or not appear) in the source title.
Once you've selected a source this panel will collapse so that it doesn't take up space on the screen, but can of course be expanded again when required. When you've finished converting the source, if the Next Source check box is ticked (next to the Save button), the next source in the list will be automatically selected so that you don't need to do so. This can be very useful if you're just going to methodically work through a list of sources to convert.

Overview of the Conversion Process
The steps descibed below assume that you are using this screen to convert plain text census sources into rich text. If you are only using the facility to convert generic sources into templated sources then you will not need to concern yourself too much with steps 2 to 6.
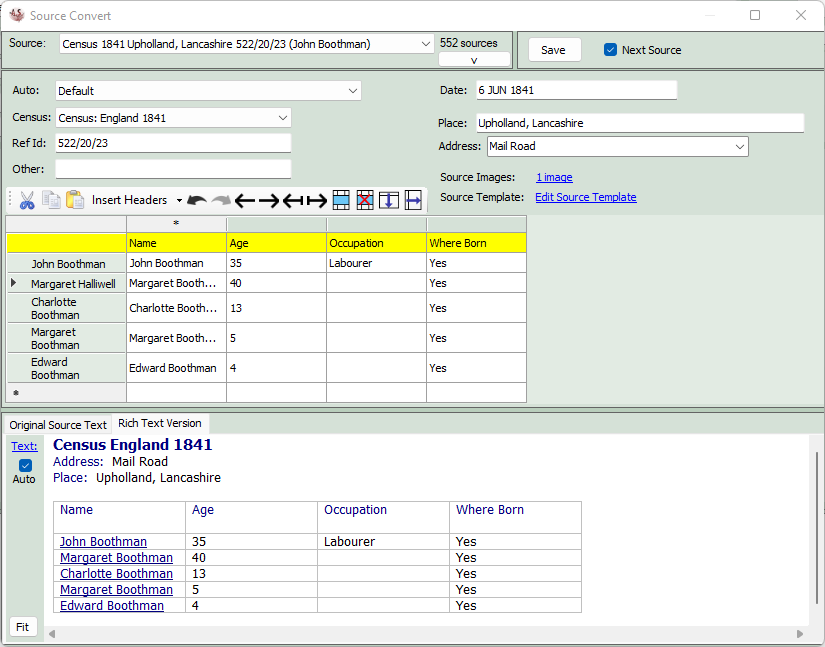
1. Ancestral Sources will examine the selected source and the associated facts to try to determine the particular census referred to. In the screenshot below it has correctly interpreted that this is the England 1841 census. If this is incorrect, simply choose the correct census from the drop down list. It will also attempt to determine the Reference ID, Place, Addresss and Date of the census. Again correct these if necessary, although this is unlikely to be required. The 'Other' field will not be determined. You will not need to enter anything into this unless your autotext template or source template makes use of the {OTHER} field. If there are source images linked then you will be able to view those by clicking on the link button.

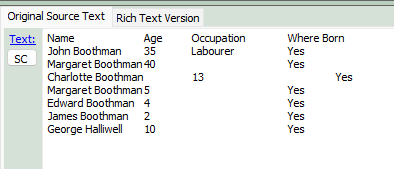
2. If there is plain source text associated with this source, this will be displayed in the Original Source Text tab at the bottom of the screen. This is not visible initially but can be seen by clicking on the tab. As you become more experienced at converting plain text sources to rich text, you may sometimes find it useful to edit the text and request AS to convert again by clicking on the SC (source convert) button.
3. If there is source text then Ancestral Sources will examine it and attempt to locate what it hopes is the table of data in the text. It will then display this data in the data grid in the centre of the screen. If there is any additional text above or below the census grid then it will display those in text boxes below the data grid. If this text is important to you then make sure that you copy and paste it into the source text below before saving, otherwise it will be lost.

4. It is important to understand that when the data grid is displayed, Ancestral Sources is not attempting to translate this into the expected columns from any census template; it simply converts the text into a grid. It will highlight the first row of the grid in yellow: this is the row that will be displayed as the header row if it converted to rich text. If the Hyper-link to individual records option is selected on the Options - General Source Text screen then it will attempt to identify a name column (identified by an asterisk * in the column header) and uses this to try to associate each row with the individuals linked to the census source. The name of the individual in your project that AS associates with each row are shown in the row header on the left. If AS ever makes a mistake in this process, or is unable to identify an individual then right-click on a row header and select the individual from the list. An individual who isn't currently linked will be indicated with an 'unlinked individual' icon.
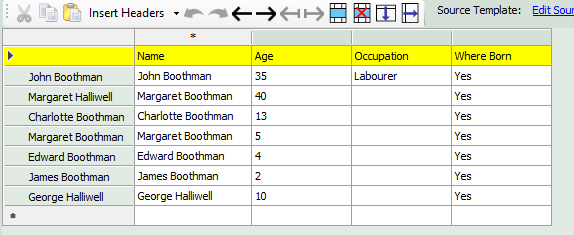
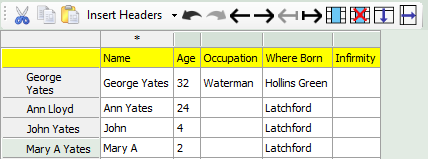
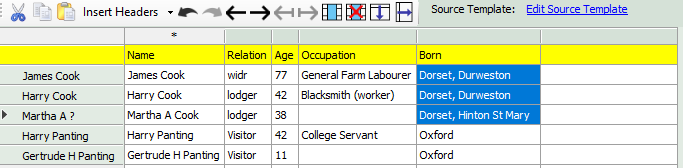
5. Depending on the formatting of the original plain text, the grid generated may be incorrect and require some editing. The grid toolbar provides a number of tools to help with this process - see the Grid Toolbar section below for details of this and also some examples of techniques to use to quickly solve formatting issues. For example, in the image below the original source text doesn't have headings and therefore George Yates has been wrongly placed into the header row. By using the Insert Headers button and then some of the tools the data can be made to look like the image below in less than a minute.
Before:

After use of grid tools:
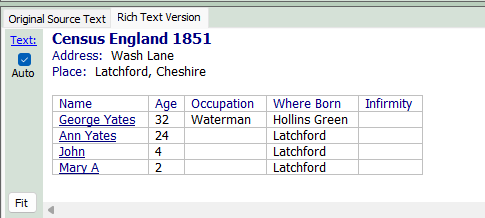
6. Under the Rich Text Version tab, a converted version of the census entry will be displayed, based on the auto-text template selected. If the Hyper-link to individual records option is selected on the Options - General Source Text screen, then the hyperlinks will be included for the column identified as the name column. Once you're happy that the data in the main grid is correct, you should use the Fit button to reduce the column widths. Fit will also remove any addtional blank columns at the end of the grid that may have appeared due to edits made. You can also manually edit the rich text if you wish, but it is usually easier to edit the grid rather than the rich text table.
7. If you are converting a generic source to a template source then click on the Edit Source Template link and edit the fields as required.
8. Click the Save button to carry out the conversion. If the Next Source check box is ticked, the next source in the source list will be selected automatically.
Grid Editing Tools
To take full advantage of the Grid Editing facilities you will need to be familiar with how to select cells in the grid. Clicking a cell will highlight the cell. If you then hold down the shift key on the keyboard you can then click in another cell, all of the cells between the two cells will be highlighted. You can also click on cells with the ctrl/control key to highlight cells one at a time. Click on them again to deselect.
To edit the text within a cell you need to click on it two or three times. The first click will select the cell, the second will highlight all of the text within the cell (useful if you need to replace all the text in the cell), the third will place the text cursor within the cell.

Cut/Copy/Paste: You can highlight cells and then cut, copy and paste them as required. If you're very confident in the use of these facilities, you may find this to be the quickest way to make the majority of the edits required. The usual shortcuts can also be used: Ctrl+x for cut, Ctrl+c for copy, Ctrl+v for paste.
Insert Headers: Click on this to insert a new row at the top of the grid with the census column titles specified in the census template for the selected census year. If the source text being converted was originally created by Gedcom Census, the predecessor of Ancestral Sources, then it may be that only some of the census columns were included in the transcript, in which case you may wish to click on the small down arrow and choose GC Header. This will insert the Name, Related, Cond, Age, Occupation and Birth Place column headings that Gedcom Census used.
Undo/Redo: The undo and redo buttons allow you undo and reapply changes you make to the grid as required. The usual shortcuts of Ctrl+z, Ctrl+y can also be used.
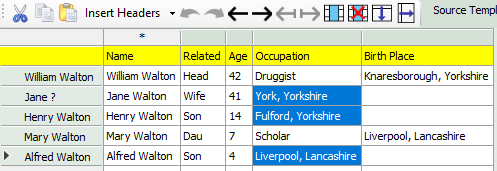
Move Left/Right: If you highlight one or more cells then clicking these buttons will move those cells to the left or right. For example in the screenshot below three of the values in the occupation column should be in the Birth Place column. So highlighting these 3 cells (by selecting the cells with the CTRL/Control key held down) and clicking on the move right arrow will correct this problem.
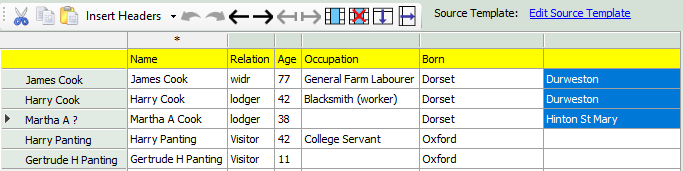
If the cell text is moved into a cell that is already occupied, it will be added to the contents of the cell with a comma and space between them. In the example below, the Born column has been split into two columns for the first three people. Highlighting the three values and clicking the left move button will correct this.
Before:
After:
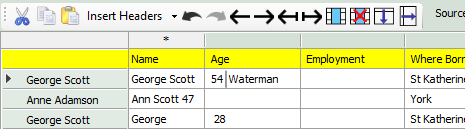
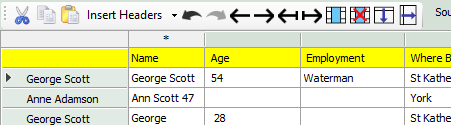
Split Move Left/Right: Sometimes it is necessary to split the text in a grid cell that has been incorrectly formatted. In the example below the Age for George Scott is given as '54 Waterman' and the name for Ann Scott as Ann Scott 47. George Scott's age/occupation can be split by placing the cursor between the 54 and Waterman by left-clicking 3 times (as explained above - first click selects the cell, second click all the text in the cell) and then press the Split Move Right button. If there is already text in the cell to the right the text that is moved will be added to the front of the text already in the cell, separated by a space. The Split Move Left button works in a similar way.
Before:
After:
Insert Row/Column: Select a row or column my clicking on a row or column header and then click the Insert button to add a new row/column to the grid.
Delete Row/Column: Select rows or columns that you wish to delete and then click this button. You can select multiple rows or columns by holding down the shift key to select a range or the ctrl/control key to select separate rows/columns.
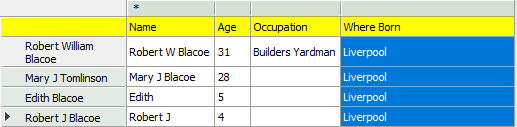
Fill Down: Highlight a number of cells in a column (or multiple columns) and click the Fill Down button to replicate the value in the top cells into each of the cells below. For example, this entry has only had the Where Born entered for the first person. So highlight the column and click Fill Down to copy Liverpool into each cell below.
Before:

After:
Fill Right: This works in exactly the same way as Fill Down, but fills across a row instead.
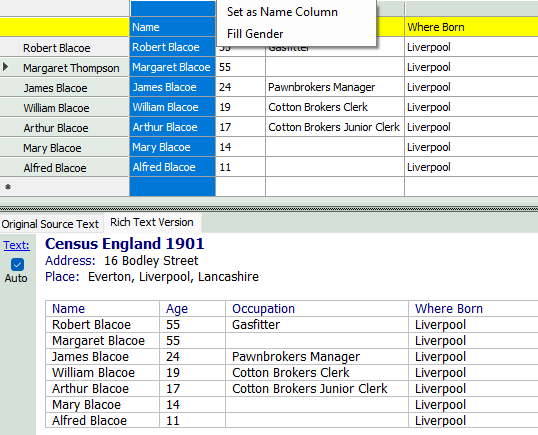
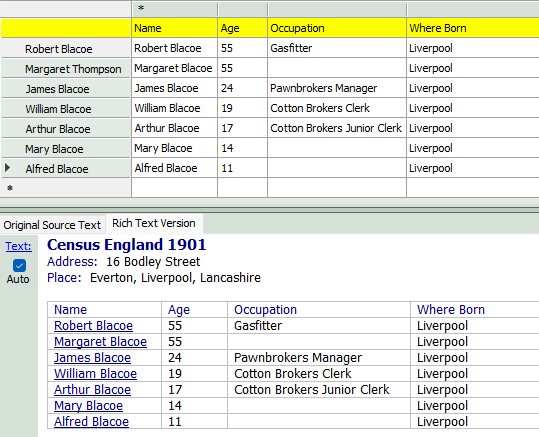
Column Header Context Menu: Set as Name Column
Right-clicking on a column header reveals a context menu which may be helpful in certain circumstances. If you are using the facility for hyperlinks to be added to the names of individuals in the rich-text, then the name column has to have the asterisk (*) indicated for the name column so that AS knows to which data the hyperlink should be added. If there isn't a name column indicated or the wrong column is being used then right-click on the column header and choose Set as Name Column. The example below shows a situation where there is no name column and therefore no hyperlinks shown in the rich text source text.
Before:
After:
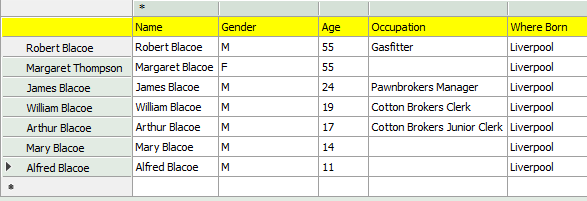
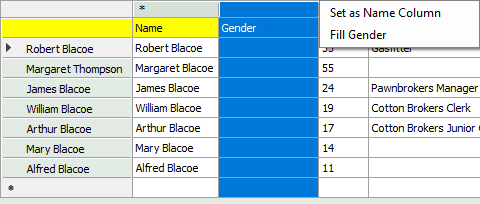
Column Header Context Menu: Fill Gender
If your original plain text transcript didn't include the gender column then you can use the Fill Gender option to automatically fill M or F down the column based on the gender recorded for the individuals referred to in the row header. In the example below a new column has been inserted for Gender and then the Fill Gender function is used to fill in this data.
Before:
After: