Ancestral Sources Main Screen: Add Images to Existing Sources
The help for this page is split into the following sections:
File Menu
Open FH Project: This menu item will only appear if Ancestral Sources detects that Family Historian 4 or 5 (or later) is installed on the computer. Family Historian 4 was the first version to include 'projects'. If your family history file is part of a project then this option should be used. The file will be opened, individuals displayed and the record details can then be typed in. Also available as a shortcut on the tool bar.
Open Gedcom File: Select the GEDCOM family history file to be edited. The file will be opened, individuals displayed and the record details can then be typed in. Also available as a shortcut on the tool bar if your PC does not have Family Historian 4 or 5 (or later) installed.
Current Project/File is default: If this item is ticked then the current file or project will be opened automatically whenever Ancestral Sources starts. If you no longer want the current file to be opened each time then un-tick this option.
After Save: There are options to have Ancestral Sources automatically close after the successful save of an entry or alternatively to minimise. Some users prefer to always view an entry in Family Historian following a successful save and this makes that process easier.
Save entry to File: Once all of the various text boxes have been filled in, the individuals have been added to the grid, images linked (if applicable), source text filled in (if applicable), etc. then choose this menu item to add the entry to the file. Also available as a shortcut on the tool bar.
Recent Files/Projects: Shows the most recently accessed files and/or projects. Click on one of these to open.
Exit: Choose this to finish using Ancestral Sources.
Edit Menu
Cut: Cuts the currently selected text. Also available as a shortcut on the tool bar. Ctrl+X can also be used as a shortcut
Copy: Copies the currently selected text. Also available as a shortcut on the tool bar. Ctrl+C can also be used as a shortcut
Paste: Pastes text previously cut or copied into the clipboard into the current text box at the insertion point. Also available as a shortcut on the tool bar. Ctrl+V can also be used as a shortcut
Delete: Deletes the currently selected text. The delete key can be used as a shortcut
Add/View Images: This opens up the Image Viewer screen to enable images to be linked to the source, facts or citations being viewed. This can also be achieved by clicking on the Add/View Images link in the Linked Images panel.
Clear/Reset Current Entry: This will clear all text boxes, lists, images selected, etc. so that you can begin to enter again.
View Menu
This menu allows the user to choose the type of entry they wish to enter. These options are also available on the tool bar. In the current version of Ancestral Sources census, birth, baptism, marriage, death, burial/cremation and monumental Inscription sources are supported as well as the ability to add images to existing sources.
Tools Menu
Autotext Template Editor: This opens the Autotext Templates screen which can be used to create templates for use with the source-text Auto button. Not relevant if adding images to existing sources.
Source Templates: This opens the Source Template Editor. Family Historian 7 introduced the concept of Source Templates which add additional fields to sources to allow more structured citation information to be recorded. You can use this feature if you have Family Historian 7 or later and use recording method 1. This is not relevant if adding images to existing sources.
Flag Assignment: This opens the Flag Assignment screen to allow you to specify that Family Historian flags be added to individuals when an entry is made.
Flag Batch Add: This opens the Flag Batch Add screen that enables you to retrospectively apply flags to individuals based on the existing event/source types previously applied.
Address Merge: This opens the Address Merge screen. This allows addresses that have been recorded inconsistently for a place, to be merged into one. Note that this option will cancel any existing entry that is partially complete.
Customise: This opens the Customise screen which allows the user to choose an existing colour scheme or their own scheme for Ancestral Sources. It is also possible to change the font and font size used throughout. Sometimes changing the font size doesn't satisfactorily resize the various text boxes and panels on the screen. This is usually solved by closing and re-opening Ancestral Sources. Be aware that larger font sizes will require forms to be resized to a larger size and it is possible that users with smaller screen resolutions and/or with larger DPI settings will not be able to see all of the information on the screen. In this situation it is recommended that you use the smallest font size (8). This screen also allows you to specify the size of the toolbars used on the main screen and when editing richtext.
Edit Lists: This will display the Edit Lists screen which allows you to customise some of the drop-down lists of items shown for different source types, including the standard list of occupations.
Project Specific Settings: This menu item will only be visible if the project that is open has been used by Ancestral Sources on other computers. See the Project Settings help page for details.
View Log Files: This opens the Log File Viewer screen. Each change made to the GEDCOM family history file when entries are saved is logged and these can viewed on this screen.
Options: This opens the Options screen which allows various settings to be changed.
Backup A.S. Options: Use this option to backup your Ancestral Sources settings to a compressed zip file. This zip file will contain the 4 XML settings files used by Ancestral Sources (in the Settings folder specified in the Options screen. It will also include a backup of the registry settings which are machine specific - these will only be able to be restored to the same computer. By default this backup will be saved to the Backup folder specified in the Options screen. If your PC ever needs to have Windows reinstalled or you wish to transfer your settings to another PC then backup your setting to a file. Once Ancestral Sources is installed on your new PC (or newly installed operating system) you can then choose 'Restore A.S. Options' and select all the settings files.
Restore A.S. Options: See Backup A.S. Options above for details.
Help Menu
This menu has links to this help file. In addition it has the following menu items:
Ancestral Sources Forum: This will open up the Ancestral Sources forum at the Family Historian User Group website.
Email Support: This will open up an email window to contact the author of Ancestral Sources
Show Welcome Screen: The welcome screen is displayed every time Ancestral Sources opens unless the user has unticked the option to show the screen on startup. This menu item causes the welcome screen to be shown.
Check for updates: This will connect to the Ancestral Sources website to see whether a new version of Ancestral Sources is now available.
Make a donation: Ancestral Sources is free to use but many users opt to make a donation to the author to encourage him to keep developing the software. Choose this option to make a donation.

You must first select the source type from the drop-down list (in the current version you can only select birth, baptism, burial/cremation, census, death or marriage). A list of all sources in your file of this type will then be displayed. Underneath the chosen source a reminder of the recording method used for this source type are shown. For example you may use 'recording method 1' in which case any images to be added will be linked to the source itself. If you use 'recording method 2' then images will be linked to facts or citations depending on the options you have chosen.
If you use recording method 1 then you will see a tick-box which can be used to only display sources that don't already have images attached. This can be useful if you have a number of sources that already have images attached and you therefore only need to deal with sources that don't.
There is also a text box that can be used to filter the list of sources. If you enter a number and click the Apply Filter button or press Enter, then the list will be filtered to match the source with the ID specified. Otherwise only sources with a title that matches the text entered will be displayed in the list.
Adding Images to a Source (using recording method 1)
If the recording method that you use for the selected source type is method 1 then images are linked to sources. Once the source has been selected then you should click on the Add/View images link. This will display the Image Viewer screen where you can select the image or images to link to the source. Once the images have been selected choose Save from the File menu or the toolbar to save the changes to your file.
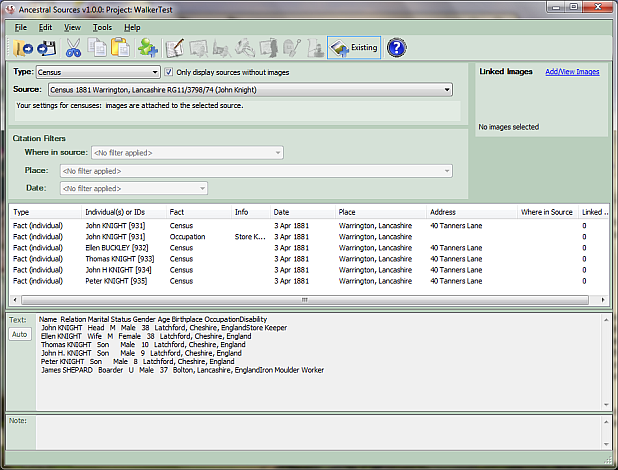
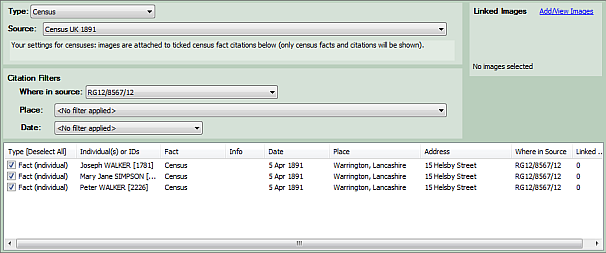
Adding Images to Facts or Citations (using recording method 2)
If the recording method that you use for the selected source type is method 2 then images are linked to facts or to citations, depending on the options you have chosen. When the source is selected you will almost certainly see a large number of facts (and possibly other records) displayed in the list box below. The list items that are ticked will have the image or images linked to them. You can either untick/tick manually or you can filter the list items by choosing from the filters. You can opt to only show items that match a particular Where in Source reference and/or Place and/or Date. Note that the final column of the list box 'Linked Images' shows the number of images linked to the facts (if you have your options set to link images to facts) or to the citations (if you have options set to link images to citations).
Once the facts/citations have been selected then you should click on the Add/View images link. This will display the Image Viewer screen where you can select the image or images to link. Once the images have been selected choose Save from the File menu or the toolbar to save the changes to your file.
Note that some of the citations listed may be displayed as being 'unsupported' - there are a wide variety of places in GEDCOM files where citations can be recorded. Some of these citation types may be displayed as 'unsupported' although it is still possible to link images to these citations if the option to link images to all citations is selected.
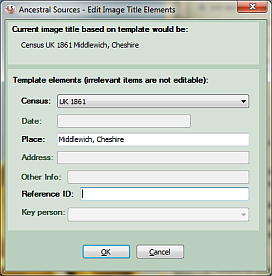
Image Name based on image template
Note that if the name to be given to the images depends on an image template then Ancestral Sources will attempt to determine the values to replace the template tags by examining the relevant facts. However, these values may not always be correct and some template tags can't be determined. A window will appear to allow you to edit and/or review the values to replace the tags.