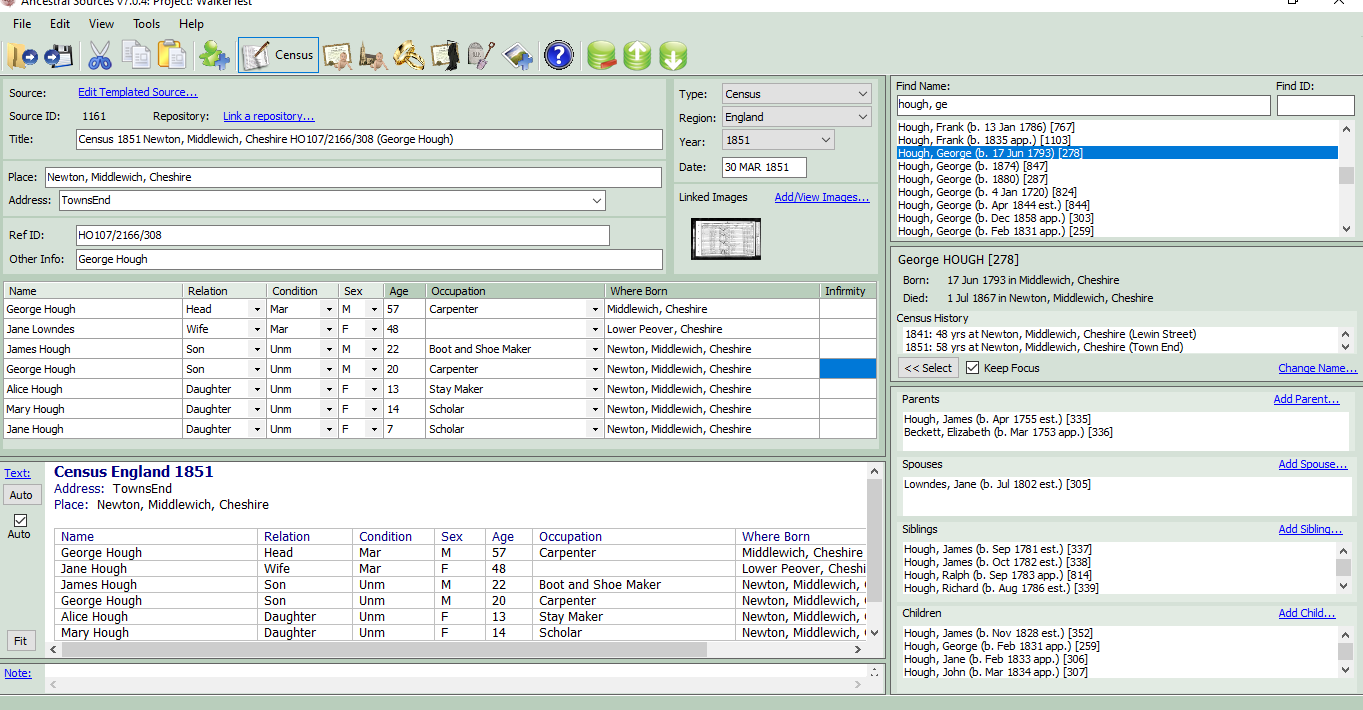
Ancestral Sources Main Screen: Census Records
The help for this page is split into the following sections:
File Menu
Open FH Project: This menu item will only appear if Ancestral Sources detects that Family Historian 4 or 5 (or later) is installed on the computer. Family Historian 4 was the first version to include 'projects'. If your family history file is part of a project then this option should be used. The file will be opened, individuals displayed and the record details can then be typed in. Also available as a shortcut on the tool bar.
Open Gedcom File: Select the GEDCOM family history file to be edited. The file will be opened, individuals displayed and the record details can then be typed in. Also available as a shortcut on the tool bar if your PC does not have Family Historian 4 or 5 (or later) installed.
Current Project/File is default: If this item is ticked then the current file or project will be opened automatically whenever Ancestral Sources starts. If you no longer want the current file to be opened each time then un-tick this option.
After Save: There are options to have Ancestral Sources automatically close after the successful save of an entry or alternatively to minimise. Some users prefer to always view an entry in Family Historian following a successful save and this makes that process easier.
Save entry to File: Once all of the various text boxes have been filled in, the individuals have been added to the grid, images linked (if applicable), source text filled in (if applicable), etc. then choose this menu item to add the entry to the file. Also available as a shortcut on the tool bar.
Recent Files/Projects: Shows the most recently accessed files and/or projects. Click on one of these to open.
Exit: Choose this to finish using Ancestral Sources.
Edit Menu
Cut: Cuts the currently selected text. Also available as a shortcut on the tool bar. Ctrl+X can also be used as a shortcut
Copy: Copies the currently selected text. Also available as a shortcut on the tool bar. Ctrl+C can also be used as a shortcut
Paste: Pastes text previously cut or copied into the clipboard into the current text box at the insertion point. Also available as a shortcut on the tool bar. Ctrl+V can also be used as a shortcut
Delete: Deletes the currently selected text. The delete key can be used as a shortcut
New unrelated individual: Creates a new individual unrelated to anyone in the GEDCOM family history file using the Add New Individuall screen. If this individual is related to someone in your file then instead they should be added as either a parent, spouse, sibling or child of the individual in question. See the section Selecting Individuals below. This is also available as a shortcut on the tool bar.
Add new row (person not in file): Sometimes a census household can include someone who you don't want to add as an individual in your family history file, such as a lodger or a visitor. You may, however, wish to include their details in the source text if you use the Auto-text feature. The Add new row feature will insert a blank row into the census grid so that you can manually enter their details without adding them to your file. This is also available as a shortcut on the tool bar.
Review/remove individual data changes: New individuals added or renamed can be viewed and if necessary deleted. See the help page for this.
Add current individual to the entry: The currently selected individual is added to the census entry. This item is also available via the Select button in the Individuals panel. See the section on Selecting Individuals below.
Remove selected individual from entry: The individual in the current row of the census grid is removed from the entry. This is also available as a shortcut on the tool bar when the grid is displayed.
Move selected individual up in the census grid: The individual in the current row of the census grid is moved up in the grid swapping places with the individual above. This is also available as a shortcut on the tool bar when the grid is displayed.
Move selected individual down in the census grid: The individual in the current row of the census grid is moved down in the grid swapping places with the individual below. This is also available as a shortcut on the tool bar when the grid is displayed.
Key Person: This is also available as a toolbar button. If the current census grid row contains the 'Key Person' the key icon is highlighted in yellow and the menu item will say "Is Key Person". To change the key person select a different row and click this menu item. If the {KEYPERSON} keyword is used as part of a source title, image title, auto-text template or source template then this will display the name of the individual designated as the Key Person.
Fill data down selected cells: Highlighting at least 2 consective cells in a column of the census grid and using this function, fills the contents of the first cell down to the other selected cells. This is also available as a shortcut on the tool bar when the grid is displayed. There is also a Ctrl+D shortcut for this.
Auto Text: This causes the source text box to be filled with a text representation of the census grid. This is also available by using the Auto button next to the source text button. See the section on Source Text and Notes below.
Add/View Images: This opens up the Image Viewer screen to enable images to be linked to the census entry or viewed. This can also be achieved by clicking on the Add/View Images link in the Linked Images panel. See the section on Census Information below.
Edit Templated Source: This option will only be shown if the option to used Templated Sources is selected. This menu item performs the same task as clicking the Edit Templated Source... link described in the Source section below.
Link a Repository: This option will only be shown if Templated Sources are not being used and the option to use repositories is selected. This menu item performs the same task as clicking the Link a repository link described in rhe Source section below.
Edit Source Text: This menu item carries out the same task as selecting the Text link described in the Source Text and Notes section below.
Edit Source Note: This menu item carries out the same task as selecting the Note link described in the Source Text and Notes section below.
Clear/Reset Current Entry: This will clear all text boxes, census grid, images selected, etc. so that you can begin to enter again.
View Menu
This menu allows the user to choose the type of entry they wish to enter. These options are also available on the tool bar. In the current version of Ancestral Sources census, birth, baptism, marriage, death, burial/cremation and monumental Inscription sources are supported as well as the ability to add images to existing sources.
Tools Menu
Autotext Template Editor: This opens the Autotext Templates screen which can be used to create templates for use with the source-text Auto button. See the section on Source Text and Notes below.
Census Templates: This opens the Census Template Editor which allows the user to add or edit templates. For example the user may wish to add a new census for a different country such as France, or a year not currently available in Ancestral Sources. Alternatively the user may wish to make changes to a template supplied.
Source Templates: This opens the Source Template Editor. Family Historian 7 introduced the concept of Source Templates which add additional fields to sources to allow more structured citation information to be recorded. You can use this feature if you have Family Historian 7 or later and use recording method 1.
Flag Assignment: This opens the Flag Assignment screen to allow you to specify that Family Historian flags be added to individuals when an entry is made.
Flag Batch Add: This opens the Flag Batch Add screen that enables you to retrospectively apply flags to individuals based on the existing event/source types previously applied.
Census Source Convert: This opens the Census Source Convert screen which can be used to convert existing census sources with plain text into rich text, and/or to convert generic sources into templated sources. Note that this option will cancel any existing entry that is partially complete.
Address Merge: This opens the Address Merge screen. This allows addresses that have been recorded inconsistently for a place, to be merged into one. Note that this option will cancel any existing entry that is partially complete.
Customise: This opens the Customise screen which allows the user to choose an existing colour scheme or their own scheme for Ancestral Sources. It is also possible to change the font and font size used throughout. Sometimes changing the font size doesn't satisfactorily resize the various text boxes and panels on the screen. This is usually solved by closing and re-opening Ancestral Sources. Be aware that larger font sizes will require forms to be resized to a larger size and it is possible that users with smaller screen resolutions and/or with larger DPI settings will not be able to see all of the information on the screen. In this situation it is recommended that you use the smallest font size (8). This screen also allows you to specify the size of the toolbars used on the main screen and when editing richtext.
Edit Lists: This will display the Edit Lists screen which allows you to customise some of the drop-down lists of items shown for different source types, including the standard list of occupations.
Project Specific Settings: This menu item will only be visible if the project that is open has been used by Ancestral Sources on other computers. See the Project Settings help page for details.
View Log Files: This opens the Log File Viewer screen. Each change made to the GEDCOM family history file when entries are saved is logged and these can viewed on this screen.
Options: This opens the Options screen which allows various settings to be changed.
Backup A.S. Options: Use this option to backup your Ancestral Sources settings to a compressed zip file. This zip file will contain the 4 XML settings files used by Ancestral Sources (in the Settings folder specified in the Options screen. It will also include a backup of the registry settings which are machine specific - these will only be able to be restored to the same computer. By default this backup will be saved to the Backup folder specified in the Options screen. If your PC ever needs to have Windows reinstalled or you wish to transfer your settings to another PC then backup your setting to a file. Once Ancestral Sources is installed on your new PC (or newly installed operating system) you can then choose 'Restore A.S. Options' and select all the settings files.
Restore A.S. Options: See Backup A.S. Options above for details.
Help Menu
This menu has links to this help file. In addition it has the following menu items:
Ancestral Sources Forum: This will open up the Ancestral Sources forum at the Family Historian User Group website.
Email Support: This will open up an email window to contact the author of Ancestral Sources
Show Welcome Screen: The welcome screen is displayed every time Ancestral Sources opens unless the user has unticked the option to show the screen on startup. This menu item causes the welcome screen to be shown.
Check for updates: This will connect to the Ancestral Sources website to see whether a new version of Ancestral Sources is now available.
Make a donation: Ancestral Sources is free to use but many users opt to make a donation to the author to encourage him to keep developing the software. Choose this option to make a donation.
About Ancestral Sources: Shows the version number and some acknowledgements.
On the right hand side of the main screen is a panel to allow individuals to be selected and added to the entry. Once the GEDCOM family history file has been opened all of the people in the file are displayed in the list at the top of the panel, in alphabetical order. Depending on the Options chosen after each name the date of birth and/or ID will be shown. You can either scroll through the list to find an individual or type their name or ID into the text boxes at the top.
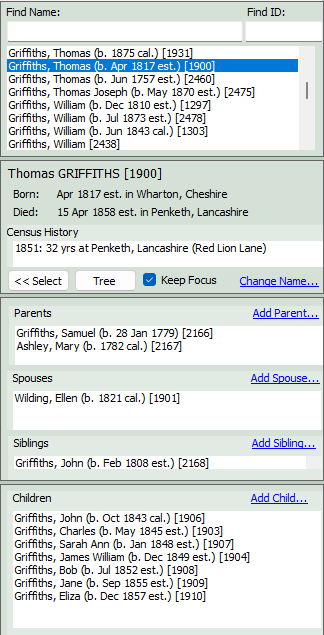
The individual highlighted in the list will be displayed in the panel below. This includes a list of census events already entered for this individual if there are any. If a census has been selected then this individual can be added to the census grid by clicking the <<Select button. The first person selected will automatically have keep focus ticked. This means that immediately after any other individual is added to the grid Ancestral Sources will switch back to this person. This is because in most cases the person selected first is the head of household and the other individuals will be related to them. However, any individual can be given this focus at any time by ticking keep focus.
Once an individual is selected the four lists below will have people added if applicable to show their known parents, spouses, siblings and children. By clicking on individuals in these lists it is possible to navigate through the relatives of the individual. Once the individual to be added to the entry is displayed they can be added to the census grid by clicking on the <<Select button again. Alternatively double-clicking on an individual in any of the 5 lists will select the individual and click on the <<Select button in one step.
If a census entry shows that an individual has a parent, spouse, sibling or child that does not exist in the GEDCOM family history file then it is possible to add them using one of the options Add Parent, Add Spouse, Add Sibling, Add Child. Alternatively an entirely new individual with no known link to anyone in the file can be added using the New unrelated individual toolbar or Edit menu item. Whichever of these options is chosen will cause the Add New Individual screen to appear. Note that if a census entry includes someone who does not appear to be of interest or any relation to you (e.g. a lodger or landlord) you should not feel obliged to add them to your file. Just leave them out of the census entry and perhaps just add them to your source text (if you transcribe your census sources) or source note.
There is also a link Change name which brings up a window to allow you to enter a new name for the individual. A citation will be created for this when the census source is saved assuming the 'name citation' option is ticked in the Option screen.
If the selected individual has children recorded then the Tree button will be enabled. This can be used to display a descendant tree for the individual. This Tree View can be used as an alternative method to select individuals. When in census mode this can be used as a quicker way to add multiple people to the census grid.
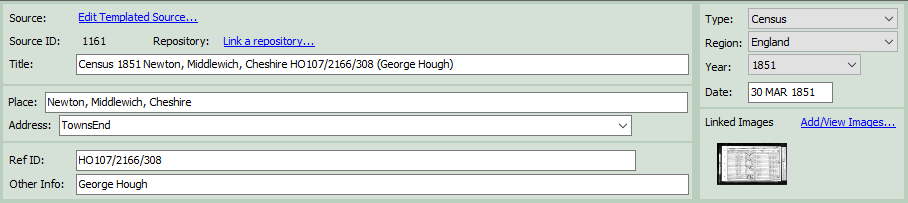
Source
If census recording method 1 is being used (See Options) then Ancestral Sources will automatically create a new source when the entry is saved with the source id displayed and the title shown in the Title text box. The title is based on the method 1 title template specified in the Options screen. Alternatively a title can be entered manually by the user.
If you are using recording method 1 with a file created in Family Historian version 7 (or later) and have opted to use Source Templates then you will see a link button to open up the source template screen. It is best to use the source template screen after filling in the other relevant data on the screen (dates, place, address, etc.) as some of the source template fields may be automatically populated with that data.
If census recording method 2 is being used then an existing source can be chosen from the drop down list and this is the source that the facts created will be linked to via citations when the entry is saved. Alternatively a new census can be created by selecting New Source... from the source list. This would only be used where a suitable source does not exist. The source created would have the Source ID specified and the title shown in the Title text box. The title is based on the method 2 title template specified in the Options screen. Alternatively a title can be entered manually by the user.
If the Source Short Title option has been selected then the Title label will instead show as a link entitled Long Title. Clicking this link will allow you to toggle between the long title and the short title for this source. The short title will also be based on the template specified or you can edit the short title manually.
If a new source is being entered or if the source selected does not have a repository recorded, then the user can optionally choose to Link a Repository. A repository can be used to record where this particular source was found, e.g. a website, library or record office. Clicking on Link a Repository will bring up the Repository screen where a new or existing repository can be selected.
Place and Address
The census place can be entered in the place text box. As you enter the title Ancestral Sources will try to predict the place being entered by looking for the most frequently occurring place in the GEDCOM family history file. The census place is the town or village, e.g. Preston, Lancashire, England.
Once the place has been entered an address can be typed in, this would be the house number or name and road (if known) within the place. In smaller villages it may not be possible to record an address as this may not be specified in the census entry. Alternatively an address that has already been recorded for the place can be selected from the address drop-down list.
In additional, all Place/Address controls have a button next to the Place text box that opens up the Place and Address Picker which allows the place to be searched with more flexibility.
Ref ID
Some census records are often identified by a reference number. For example an 1851 UK census entry might have the reference HO107/34/75. If the census template for the country and year has a reference start specified and the appropriate option is selected then the beginning of this reference (e.g. HO107/) will be automatically filled in when the census year is selected. If you are using recording method 2, or you have the relevant option set for method 1, this information will be recorded in the Where in Source source citation field. There is a further option for recording method 1 to save this data in the source Publication Information field.
Other Info
This is a box to enter information into as required by the user which will appear in either the source title and/or the image title. Note that if the {OTHER} tag isn't included in the template for the source or image title or autotext template, then there is no point entering data into this box as it won't be recorded anywhere.
Census Country/Year/Date
The census country and year can be selected from the drop-down lists. The date of the census will be automatically filled in but can be edited if need be. As soon as the date is selected the headings for the census grid below will be displayed.
Linked Images
To link multimedia images of the census to the entry click on Add/View Images and the Image Viewer screen will appear. Any number of images can be linked though it is unusual for a census entry being recorded to spread over more than 2 images. As each is linked a thumbnail of the image will appear in the Linked Images panel.
Once the census country and year has been selected then the headings for the census grid will be displayed. The number, type and names of the columns will depend on the particular census country and year selected as each grid is based on the census template defined for the entry.
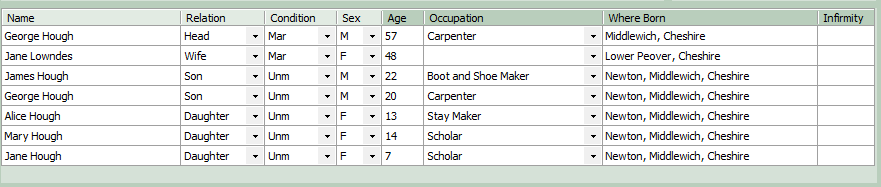
If an individual is selected using the <<Select button (or by double-clicking on an individual in one of the lists) then they will be added as a new row in the grid. An individual in the grid can be moved up or down the grid or removed using the menu items or tool bar buttons described earlier. If the individual already has a census entry for the same year then you will be given the option to delete the existing census entry when the entry is saved so that the new census fact can replace it. n.b. If for some unlikely reason an individual already has more than 1 census fact for this year then only the first of these facts will be replaced.
When the individual is added to the grid, and if the appropriate options are selected, then age, place of birth, date of birth, occupation, relationship, gender and marital condition may be suggested by Ancestral sources. These suggestions can be edited by the user and other columns filled in. Only column entries with headings shaded in a darker colour will be added as facts or fact notes in the GEDCOM family history file when the entry is saved. There is no point filling in the other columns unless you will use the Auto text feature to help to record a census transcription as this is the only place that these data items will be saved.
Useful keys for navigating the census grid
Tab: moves to the next cell in the grid
Shift+Tab: moves to the previous cell in the grid
Enter: moves to the cell below in the same column
F2: Will move the cursor to the end of the text in the cell
Ctrl+right cursor key: move to start of next word in the cell
Ctrl+left cursor key: move to start of previous word in the cell
Shift+Ctrl+right cursor key: move to start of next word in the cell with text selected
Shift+Ctrl+left cursor key: move to start of previous word in the cell with text selected
If census recording method 1 is being used then text boxes will be displayed to enter source text and source note entries. These will be saved to the source created. Usually the source text is used to transcribe the census entry and the source note is used to specify any other information about the census entry if required (e.g. that the writing is difficult to read). These text boxes can be resized as required. The Text and Note titles are underlined as they are links. If clicked on a larger window will appear to make it easier to record the information.
If census recording method 2 is used then only the source text box will be shown. Depending on the options chosen the text will either be saved into the citation text or to a shared note linked to each citation.
Family Historian 7 introduced support for rich text notes and sources for the first time. Depending upon the options selected these source and note text boxes may be shown in rich text or plain text modes. See the rich source text help page for more information.
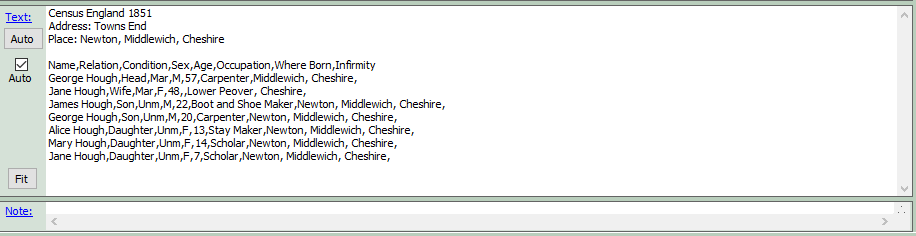
The easiest way to transcribe a census is to click on the Auto button. This will fill in the source text box with the contents of the census grid above, with using either rich text or with each column separated by tabs, commas or other characters as specified in the options screen. You may need to edit the source text to ensure an accurate transcription is made. It is also possible to use the Auto-text Templates screen to create templates which include other fields if you want these to appear in the source text generated by the Auto button.
If you are editing a census entry and use auto-text with a rich text template then you can use the Fit button to automatically reduce the main census grid to the narrowest column widths required. This will automatically also reduce the width of the auto-text version of the table too. You can then manually adjust the width of the main census grid to make corresponding changes to the auto-text version.